Tuesday, July 31, 2012

Collections: Totally Turquoise

Isn't it interesting how the same beads can be used to create different looks and even moods? The colors, textures, and patterns of natural beads are ideal for recreating our favorite themes. Turquoise, for example, with its pretty blue hue, is perfect for anything from Western themes to cool tropical designs.

Before we take a look at some summery turquoise blues, I want to congratulate Deb from Beetique, who's comment was drawn at random for the turquoise and horn bead giveaway. Thank you so much to everyone who joined in!

As always, it was great to get everyone's feedback, this time on the best natural beads. Deb's choice is turquoise - a definite favorite for many beaders. Whether natural or imitated, cool turquoise blues and greens are easy to contrast and complement, and always add a sophisticated splash of color.

Totally Turquoise Treasury


Happy beading!

Copyright 2012 Inspirational Beading
Subscribe to Inspirational Beading
Get inspired on Facebook and Google+


Saturday, July 28, 2012

Rainbow Chameleon Pendant

One of my favorite things about being a beader in the internet age, is having so many wonderful artists to interact with. We help, teach, inspire, and encourage each other, share bead sources and techniques, and sometimes just give a well deserved pat on the back.

Earlier this month, I was knocked head over heels by a little inspiration, care of Catherine from 
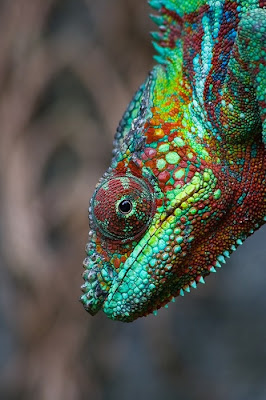
Shadow Dog Designs. Catherine is a veteran Pinterest user, and when she shared a favorite pin of a beautiful panther chameleon photograph on Facebook, I was lucky enough to be there to see it.

This charming creature has the most amazing rainbow coloration, and the bumpy lizard-skin is so akin to beads that it was totally irresistible. You know that moment when you see something and just have to bead it? It was love at first sight, and must have been meant to be, because everything just fell into place.

I knew right then that I would have to find a way to turn the photo into beadwork, and it was in the back of my mind for days. It was the lime green spots especially that caught my eye, and I was grieving the fact that I didn’t have any opaque sour apple seed beads to match. Fortunately, there was a big vial waiting for me on my bead shopping trip last week!


Panther Chameleon Design Diagram

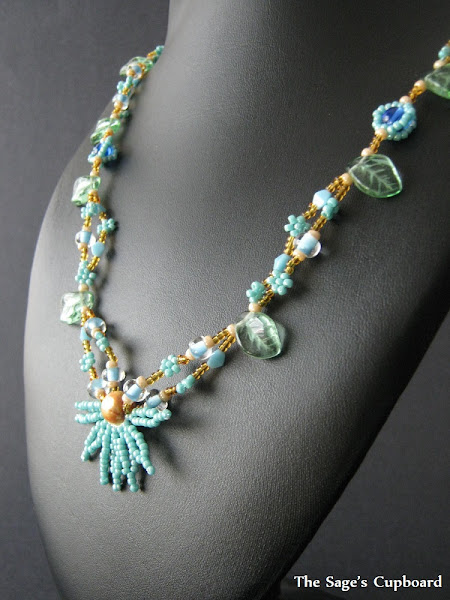
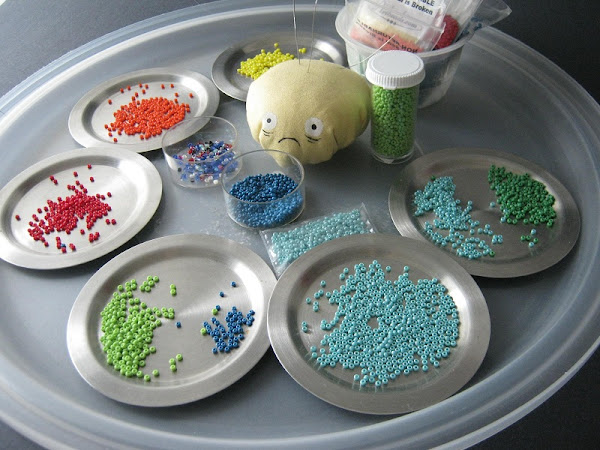
I actually put off starting the design a lot longer than I needed to. I was completely stuck on a pattern, or a method for getting the same array of colors in an organic way. I considered drawing myself a diagram to follow, but where to begin? And if I did that, would I even be able to follow it, or perhaps would it hinder the beadwork by being too rigid? Finally, I made a really simple chart that included all of the colors in the proportions that I wanted, just as a reminder of where I might want things to be placed, so I wouldn’t forget to include certain color combinations. I put the start point - the eye of the chameleon - off-center, to get a more natural, less perfect look. I ended up ignoring the chart after about 4 rounds of stitching, and just going on instinct, and it turned out just right.

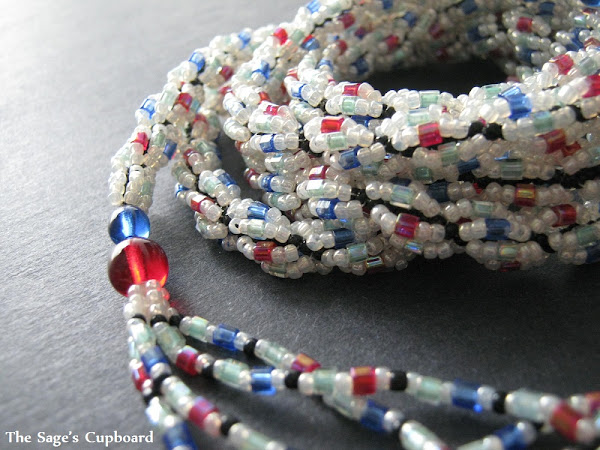
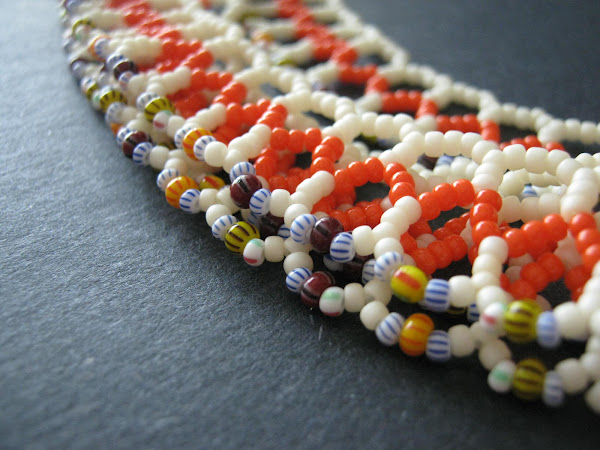
Once I had a design plan, I gathered up all of the colors that I would need to recreate panther chameleon skin, including both of the opaque vials that I had just purchased. The palette also includes pepper red (not as purplish as the real thing, but a great contrast for the lime) plus dandelion yellow, shamrock green, and lustered coral for orange. I chose cyan to be the main color for my piece, and to help with the lizardy texture effect, I used two shades of turquoise - one lustered and one AB - and alternated them whenever two or more turquoise beads were side by side.


Panther Chameleon Bead Palette


My color choices for felt backing were limited to brown, black, and dark blue. I went with the brown, because it’s natural looking and complements the turquoise nicely. I like how it looks, although I almost wish that I had known ahead of time how I was going to finish this piece. I was so excited about the beadwork, I didn’t think enough about the end result.

Panther Chameleon Medallion Necklace


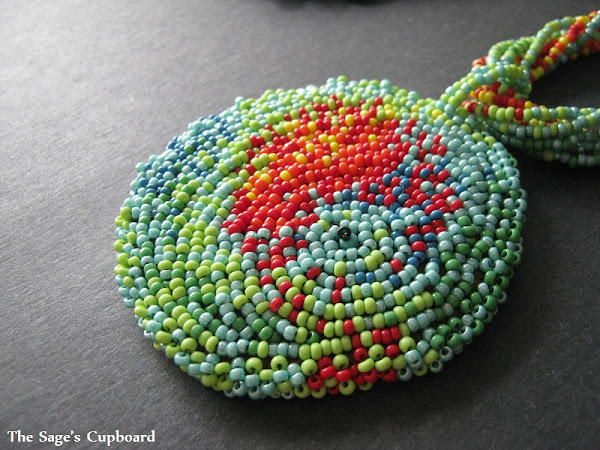
The variety of bead sizes (10/o, 11/o, and 12/o), combined with really snug stitches only added to the bumpy texture, and really gives the medallion personality. Normally I would examine every stitch and lament at those that don't line up perfectly, but for this piece, flaws are beautiful.

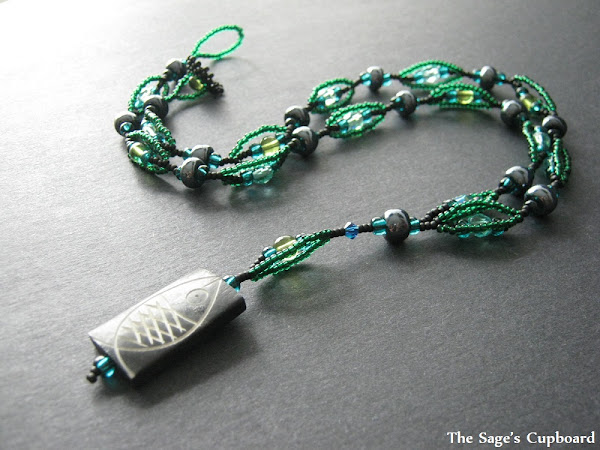
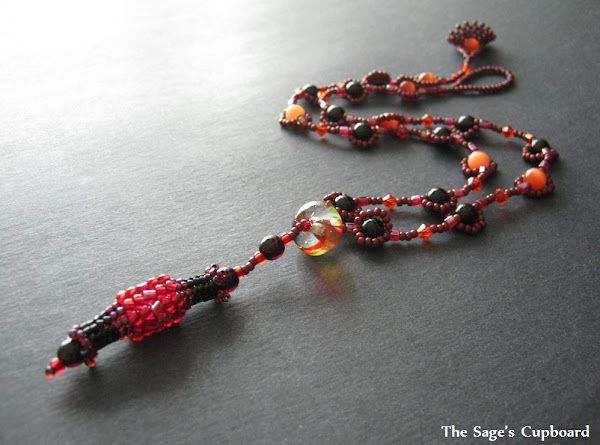
About halfway through the embroidery, I decided that I wanted to use a multi-strand base, and even though I had accent beads for the extenders that perfectly match the beadwork, I wanted to do something a little different this time around. Instead of matching my clasp chains to the multi-strand section, I thought it would be fun to have a completely neutral backdrop, and did it almost entirely in jet black. I needed a little something more than just seed beads and druks, but with no other jet black accent beads at hand, I chose a handful of dark teal coconut heishi instead. I like the way the hint of color peeks through, and highlights the intense colors of the medallion.

Panther Chameleon Medallion Necklace


Many, many thanks to Catherine for passing on such fantastic inspiration! I highly recommend checking out some of her inspiration boards for gorgeous photographs galore.

Copyright 2012 Inspirational Beading and Friends
Subscribe to Inspirational Beading
Get inspired on Facebook and Google+


Friday, July 27, 2012

Fish Bones and Swamp Water

Last week I was in the mood for a quick and easy project. I wanted to use one of the carved bone fish beads that I had purchased on a strand awhile back. There are so many, I’m not sure I’ll ever make it through them all, but it’s the kind of thing you have to tackle one bead at a time.

I tried using multiple beads in my first fish bone project, and it turned out kind of weird. This time, I wanted a simple Y necklace, with a palette that would really complement the interesting carved design. I went to the destash tray first, and selected some gunmetal E beads, and aqua fire polish rounds. I added a dash of emerald green 11/o’s, and some dark teal 6/o’s, plus a whole lot of black seed beads to back everything up. I even snuck in a solo green Swarovski bicone that's been rolling around for awhile.

Fish Bone Palette


I love the somewhat murky, mysterious quality that all the greens have when paired with black and gunmetal. They all look right at home with the fish pendant. This time around, I skipped the reverse daisy stitches and did the entire necklace in what I’ve been calling pea pod stitch.

Fish Bone Y Necklace


I still have quite a few of the gunmetal beads left, but so far they’ve proved very useful. I’m looking forward to seeing what they do next!

Copyright 2012 Inspirational Beading
Subscribe to Inspirational Beading
Get inspired on Facebook and Google+


Thursday, July 26, 2012

Bead Giveaway: Turquoise and Horn

This week I am bidding farewell to some of my absolute favorite acrylic beads. I’ve combined a selection of turquoise blue pieces, and some faux horn in a variety of lovely shapes.

The set includes lots of pretty robin’s egg blue ovals. At one time, I had hoped to hand paint these beads with tiny little hieroglyphs - the smooth finish just calls out for a little embellishment. There are also some shell-like spiral beads, rounded bicones, cubes, art nouveau discs, and more.

Faux Turquoise and Horn Beads


How to Enter:

For a chance to win all of the beads shown, all you have to do is leave a comment on this post, and answer the following question:

What is your favorite natural bead material?

The Fine Print:

Comments must be entered here on the blog for entry. If you do not have a Blogger profile with email contact enabled, please make sure to include a website, email (username AT your mail.com), or other contact method in your comment, so I can let you know if you win. This giveaway is open to readers from Canada and the US. One winning comment will be drawn at random on Tuesday, July 31st.

Turquoise and Horn Bead Giveaway


Good luck, and happy beading!

Copyright 2012 Inspirational Beading
Subscribe to Inspirational Beading
Get inspired on Facebook and Google+


Wednesday, July 25, 2012

Hexagons, Spirals, and Fringes

It’s been so long since I’ve made a lariat necklace, that I actually had to go looking through my blog archives to remember what the last design was. It’s actually one of my favorites, a violet and daisy piece with beaded beads, and I made it back in November of 2010, during the Necklace a Day challenge. That’s far too long a gap between lariats, and so when I starting planning a design to use up some of my hex cut seed beads, a super long necklace seemed like the perfect choice.

Hex Cut Seed Beads


I’ve got lots and lots of hex cut seed beads, but I hardly ever use them. As fun as it would be to weave something flat with them - like a peyote cuff - I’m not all that fond of peyote cuffs to begin with, so I’ve been passing them over for months. I finally decided to use them in a spiral rope, where they would be able to show off their sparkle, while still being protected on either side by seed beads.

I chose a palette of ruby red, sapphire blue, and seafoam, then it was on to seed beads to complement them. At first I wanted to do an Egyptian theme, but something about the colors steered me in a slightly different direction. I paired up jet black and opalescent cream (aka alabaster) for a more art deco kind of palette.

Art Deco Spiral Fail


At first I had a little trouble deciding on a pattern. I wanted a striped effect, but the black really overpowered both the alabaster and the hexagons. Luckily, I had just stocked up on opalescent cream, so I decided to dive right in and use it as the main color for the entire rope. The new pattern is much better, and has the art deco look that I wanted. The way that the black peeks through the slightly transparent cream has the same soft and misty quality as a vintage cigarette ad. I finished the ends of the lariat simply with a pair of druks and a bit of hex and seed bead fringe.

Art Deco Lariat


Unfortunately, I ran out of seed beads before hexes, so I still have a few grams left of each color. There’s always room for more lariats though!

Copyright 2012 Inspirational Beading
Some Images Hosted by Pinterest
Subscribe to Inspirational Beading
Get inspired on Facebook and Google+


Tuesday, July 24, 2012

Tutorial: How to Make a Resin Clay Ring

One of my favorite things about making beadwork rings is having total control over the entire design - there are no pre-made components apart from the beads themselves. But beadweaving isn’t the only method for making a totally one of a kind ring! Today my guest is Claire Humpherson of Beads Direct UK, who is sharing a fun tutorial for making a unique cocktail ring entirely from resin clay and bead accents. Claire says:

"When I first tried resin clay I have to admit I wasn’t quite sure about it. I really didn’t realize I was getting myself into a new jewellery making addiction until it was way too late, I was already hooked! Now I can’t stop making jewellery with resin clay.

Resin clay is a two-part epoxy clay that air dries to produce something as solid and hardwearing as polymer clay. My favourite part? That means you can set almost anything in the clay, because it doesn’t need to be able to withstand any heating or firing. And I just love setting crystals and all things Swarovski!"

Here’s how to use this fabulous clay to make a resin clay ring like the heart and butterfly pieces shown here. You will need:

Resin Clay Crystal Cocktail Rings

Clay and tools:

Black Resin Clay

Clay Roller

Clay Spacers

Clay Balm

Clay Cutter

Sanding Pads

Swarovski Elements:

Crystal Flat Back Mix

Amethyst Crystal Flat Backs

Crystal Volcano Flat Backs


To Create a Resin Clay Ring:

1. Take an equal amount from each pot of resin clay, a ball about the size of a grape from each should be about right. Mix these together until you get an even colour, this starts the reaction in the clay which will lead to it hardening. When you are happy that the colour is even, leave to sit for around 10-15 minutes.

Mixing Resin Clay


2. Whilst the clay sits, find the right size for your ring and roughly mark it on the ring mandrel. Resin clay does not shrink as it cures so you just need to find the size that will fit your finger.

3. Cover the mandrel in cling film (plastic wrap), wrapping around it tightly once or twice.

4. Go back to your clay. Add a little clay balm to your mat and roller. Place 2mm spacers either side of the clay and roll out until you get an even 2mm thickness of clay.

Rolling Out Resin Clay


5. Place a spacer on the clay and use it as a guide to cut a straight line down the length of the clay. Cut again parallel to the straight edge to create a band around 1cm wide.

Cutting Resin Clay


6. Pick up this band and wrap round the mandrel at the point you marked earlier. Bring any excess over so the ends overlap.

7. Cut through the overlapping clay at an angle. Remove any excess above and below, and you should be left with two ends that fit neatly together.

How to Cut a Ring Band from Resin Clay


8. Use a clay tool and a little water to gently press the ends together, joining the ring. Tidy up the edges with clay tools if necessary. Place the mandrel to one side, positioning it so the ring doesn’t touch anything. I placed the end in a small pot but you could also rest the mandrel diagonally on a block. Always keep the thick end of the mandrel at the bottom.

9. Roll the excess clay into a ball and roll out again to a 2mm thickness. Cut your chosen shape for the top of the ring from the clay using a clay cutter.

Cutting Shapes from Resin Clay


10. Use a sponge to brush a black pigment colour over both the clay shape and the ring base. This gives a shinier, more pearlescent look to the clay.

11. Use tweezers to push crystals into the shape you have cut for the top of your ring. Push down as far as you can without affecting the shape of your clay piece. The further you can push them in, the more likely they are to set into the clay without the need for glue or adhesive.

Embellishing Resin Clay with Flatback Crystals


12. Roll a small ball of clay about the size of a pea and squash on top of the ring base at the join you made earlier. Place your ring topper shape on top of this ball of clay and push down to make sure it adheres. Position as you wish, I shaped my butterfly so the wings point slightly upwards.

13. Leave the whole ring to cure for 24 hours until hard.

Curing Resin Clay Rings on the Mandrel


14. Once cured, gently brush off any loose pigment powder. Sand any rough edges using a sponge sanding pad, and then your ring is ready to wear!

Heart Shaped Resin Clay Crystal Ring Butterfly Resin Clay Crystal Ring


All supplies used in this project are available online at beadsdirect.co.uk. You can also find more fun jewelry making projects on the website, and tutorial videos on YouTube at Beads Direct TV.

Many thanks to Claire for providing this fun ring tutorial! Inspirational Beading has not received products or compensation for sharing this post.

Copyright 2012 Inspirational Beading and Claire Humpherson
Subscribe to Inspirational Beading
Get inspired on Facebook and Google+


Sunday, July 22, 2012

Lotus and Leaves Necklace

Last week I finally got around to working with a packet of wavy Czech glass leaves that have been waiting patiently in the destash box. Like many of the materials that I’m trying to use up, I was hoping that an idea would come along that would be different from the other projects I’ve done with these beads. And in the end, I once again decided to go with what works.

The last time I used these pretty leaves was in a double daisy chain for my first beaded strawberry pendant. They looked great as spacers between the strands, cinching everything together and creating little points of interest. This time around, I went with a lotus theme, and added some other destash beads: light blue pinch bicones, wooden rounds, and the last of my blue lined E beads.

Blue Lotus Bead Palette


To bring everything together, I used transparent dark topaz for the beadwork base, with dark beige 8/o spacers. I also added a handful of cobalt druks to reinforce the beadwork and create points where the stitches could be secured, which helps keep all of the strands smooth and steady.

Instead of cutting this necklace off at a specific length, I kept on beading until I had used up all of the leaves. Since there were an odd number, and there was no place for an asymmetrical element, I have only one leaf left, and a lovely opera length design.

Blue Lotus Necklace


Copyright 2012 Inspirational Beading
Subscribe to Inspirational Beading
Get inspired on Facebook and Google+


Friday, July 20, 2012

A Bead Adventure

Yesterday my partner and I went on a fantastic trip to the bead shop capital of Vancouver Island. Truthfully, we went to see the dinosaur exhibit at the Royal British Columbia Museum, but there just happened to be a lot of beady things going on. Before I show you the new beads that I picked up while I was in Victoria, I want to share some of my favorite sights from the museum.

Eagle Totem, Victoria BC


I wish that I could tell you more about the objects I saw, but it’s impossible to read plaques when you’re with an eager group. I can tell you that most of the exhibits focus on the culture and history of British Columbia. Also, my camera is rubbish at indoor photos.

First Nations Exhibit, Royal BC Museum


First, some fantastic beadwork, including a Victorian era beaded scallop purse and some gorgeous First Nations bead embroidery. I was hoping and expecting to see something that involved beads, and was surprised to find them in nearly every exhibit.

Victorian Beaded Scallop Purse

Bead Embroidered Purse

Floral Bead Embroidered Pouch

First Nations Bead Embroidery


And there was plenty of inspiration to be found, including a fantastic steampunk-esque ocean life exhibit (which we all loved), a fossilized nautilus, and a hiding Sphinx.

Family Totem, Royal BC Museum

The Ocean Room, Royal BC Museum

Victorian Era Sphinx

Fossilized Relative of the Nautilus


And now for the beads. It has been so long since I’ve shopped in person at a bead shop, so I couldn’t leave without visiting a couple of downtown stores. I was hoping to find some unique beads that can’t be found anywhere else, and although I did grab a few things, I wasn’t as lucky as I had hoped. Both shops had a fantastic selection of gemstones and Chinese glass, so I was left with a few choices in natural materials.

I hadn’t planned on buying any seed beads, but I saw all that color and couldn’t resist. It’s interesting that I purchased different versions of exactly the same thing from each shop, but I guess it’s natural to chose one’s favorites.

Victoria Bead Shop Haul


At Victoria Bead Town Designs, I found two lovely vials of opaque seed beads, and a gorgeous carved bone feather. I had my eye out for front-drilled pendants that I could combine with a whole bunch of tagua beads I ordered last week, and this was my favorite.

Then it was on to The Bead Shop, where I eagerly scooped up two luxurious hanks of transparent seed beads - I didn’t even realize until later that they almost exactly match the other vials. I also found some carved bone ankhs, and I had to stop myself from buying the lot. I stayed well within my budget, but I’m more than thrilled with what I brought home.

Many thanks to Leah at zombies wearing helmets for the head's up about the fantastic dinosaurs exhibit, and giving me an excuse to shop for beads!

Do you shop at a Local Bead Store, online, or both? Which do you prefer?

Copyright 2012 Inspirational Beading
Subscribe to Inspirational Beading
Get inspired on Facebook and Google+


Thursday, July 19, 2012

Time Capsule: Two Necklaces

Looking back on three years of Inspirational Beading posts was rather interesting this month, because both of the projects that I shared in July 2009 have ties to this year’s destash challenge. It’s incredible to really do the math, and realize how long I’ve been at this, and how far I’ve come. The fact that I’m still holding on to materials from way back then also makes the challenge seem worthwhile.

First there was a little bezel experiment, done with ordinary glass globs or nuggets. I have about a hundred of them, and although I haven’t officially included them in the list of destash beads, I do want to use up a few more of them before the year is out. Only a handful will be round enough for a really nice design, but I do love the look of the glass, and the nostalgia that comes from working with such curious components.

Blue Bezel Pendant Nature Nut Lariat


That month I also completed one of my all time favorite projects. The Nature Nut Lariat still stands out in my memory, because I was so looking forward to creating it. I had just finished several weeks of custom work, and it was the first thing that I made just for the fun of it. It was also a treat to work with the unique nut beads, and have the piece turn out even better than planned. I’m happy to say that this necklace recently found its owner, and it was such a pleasure to send it out into the world.

Do you ever look back on old designs and critique your work, or long for used up beads?

Copyright 2012 Inspirational Beading
Subscribe to Inspirational Beading
Get inspired on Facebook and Google+


Wednesday, July 18, 2012

Fire and Flame Pendant

So far during this year’s destash challenge, some of my favorite successes have been pieces that tackle more than one type of bead from the outbox. It’s incredibly satisfying to combine these destash beads in a single design, especially when the piece turns out as planned.

Last month I started a series of elemental Y pendants, with herringbone beaded bead focals. For the third piece, I chose a fire theme, and I was able to tackle four different bead styles at once. It all started with a single lampwork spacer that I received with an off-mandrel pendant last year. The simple swirl design has a shock of bright red, which would make the perfect topper for a fire necklace.

Fire and Flame Bead Palette


To add more flame, I tossed in a handful of hyacinth orange Swarovski Elements bicones, and some orange cat eyes. Even though I made my first ever starfish design with these orange beads, I still have more of them than any other 6mm round, and some of them need to go. To build the herringbone pendant, I also included ruby red AB hex cuts.

I didn’t want to go with an obvious palette of red, orange, and yellow, which could be dangerously garish. Instead, I used brown and deep garnet to round out the palette. I suppose it’s flame and char, instead of just flame. I like how it turned out, although I wish I’d had some transparent rootbeer to use, instead of the opaque red-brown. Every time I try to order some, they are sold out - they are the best brown seed beads.

Elemental Fire Pendant


I already have my eye on a destash bead for the “Ice” pendant, but I’m not ready to think winter just yet. Water will probably be the next element in the series - hopefully I can work in some more destash beads!

Copyright 2012 Inspirational Beading
Subscribe to Inspirational Beading
Get inspired on Facebook and Google+


Saturday, July 14, 2012

Bead Wish List: Pina Colada

I recently treated myself to some tropical blue coconut shell daggers that I can’t wait to use. The texture, shape, and color is incredible! The best thing about natural materials like coconut shell (after their organic charm), is how lightweight they are. You can have huge, chunky beads and still do a lot with them.

I’m still waiting for the mailman to bring the new daggers, but the combination of coconut and blue really got me thinking about piña coladas. Delicious, refreshing piña coladas. Although the traditional coconut and pineapple recipe is perfect on its own, the Blue Curaçao version is even more refreshing with its tropical color, and that's the one that comes to mind when I'm thinking of cool drinks.

In the spirit of beating the summer heat, I went on a hunt for some equally refreshing beads in creamy coconut and juicy pineapple colors, tropical blues, and natural coconut shell. Here are just a few of my favorite finds!

Pineapple Jasper Pear Drop Beads

Pineapple Jasper Pear Drops
From Artbeads.com

Coconut Wood Stick Bead Daggers

Coconut Wood Stick Beads from Happy Mango Beads


Tiny Ceramic Coconut Beads from The Crafty Bead

Yellow Trapezoid Resin Beads from Happy Mango Beads

Pale Coconut Shell Rondelles from Beadaholique

Antique Yellow Agate Faceted Rounds from Auntie’s Beads

Lillypilly Ornamental Pineapple Pendant from Fusion Beads

Pineapple Silver Lampwork Rounds by Radiant Mind

Chunky Etched Czech Glass Rectangles from Cascadia Beads

Tiny Chocolate Coconut Shell Heishi from Mia Bella Collection

Czech Glass Milky Yellow Picasso Rectangles from Lima Beads

T-Beads Transparent Aquamarine Lampwork Spacer from Fusion Beads

Vintage Italian Acrylic Pineapple Beads from Meegie’s Bead Corner

Pineapple Sparkle Lampwork Spacers by Amy of Two Glassy Ladies

Swarovski Elements Bermuda Blue Cosmic Square

Swarovski Elements Bermuda Blue Cosmic Square
From Artbeads.com


What’s your favorite drink for cooling down in summer? Has it ever inspired you to create a bead color combo?

Copyright 2012 Inspirational Beading and Friends
Subscribe to Inspirational Beading
Get inspired on Facebook and Google+


Friday, July 13, 2012

Orange Creamsicle Delight

I’m sharing destash projects a little out of order this weekend, because I just couldn’t wait to show you my latest collar. It all started with a vial of trade bead style Czech seed beads. Since I had culled these from a larger mixture, there weren’t quite enough to weave a full piece with, and I didn’t want to simply mix them in with my old African Christmas beads. I had to come up with a design that would use all or most of them, preferably in close-together groups that could easily be seen.

Naturally, I gravitated towards a collar design - I seem to be on a roll with them lately. With chevron stitch, I would be sure to have lots of loops to use the striped beads as accents. All I needed was a palette. After looking over my seed bead selection for something that would complement the variety of stripe colors, I finally settled on orange and vanilla.

Orange Creamsicle Bead Palette


I was actually really excited to see how this piece would turn out. I often shy away from orange, especially in such bright hues, but there was something about this palette that really clicked. Before I could begin, I had to separate my beads by size and count them, to make sure that I would have enough for a full collar, and help plan the pattern that I would use.

Each of the loops at the outside of the collar has three striped beads - two white with blue, and a larger one in the center. I chose colors at random, favoring the browns and yellows a little bit. I almost wish that I had chosen a different pattern - I still have lots of dark colored stripe beads left, and I find that the blue and white stripes hide the full effect of the accents a little bit. Still, I am thrilled with the design overall, and I’ve been craving an orange cream treat all week!

Orange Creamsicle Collar


Copyright 2012 Inspirational Beading
Subscribe to Inspirational Beading
Get inspired on Facebook and Google+


Thursday, July 12, 2012

World Beaders: Mexico

Since it’s too hot to type, today I want to pay a visual tribute to recent visitors to Inspirational Beading from sunny Mexico! With it’s rich history and culture, and numerous mineral resources, Mexico is another of the world’s great jewelry havens. Not just a fabulous source of silver and opals, Mexico is also home to sugar skulls and pyramids, artists like Frida Kahlo and Diego Rivera, and some of the world’s most beautiful landscapes.


Happy beading, Mexico!

Copyright 2012 Inspirational Beading and Friends
Images Hosted by Pinterest
Subscribe to Inspirational Beading
Get inspired on Facebook and Google+


Blog Widget by LinkWithin
Fire Mountain Gems and Beads

Inspiration Topics

accessories amulet Ancient Worlds Modern Beads animals April's Army art ArtFire astrology astronomy autumn awards awareness bangle beach Bead Inspired Bead Shops bead soup bead spotlight bead stash Bead Trays beaded beads beading theory beads belt bezel birthstones black blog spotlight blue boho bone book spotlight bracelet Bracelet A Week branch fringe brick stitch brown bugles buttons cabochon ceramic chain maille challenge charity chevron chain christmas collar Collections color Color Ideas color triads conservation craft shows crafts crochet crystals cuff Culled Beads current events Current Faves daggers Daily Sets daisy chain Delicas Destash drops Dutch spiral earrings Egypt Egyptian Gods embellishing embroidery environment etsy exotic fair trade fantasy fashion Favorite Beads Favorite Techniques feminine fibers film findings fire polish fixtures Flashback Test flickr inspiration flowers food found object free form fringe Geek Jewels geekery gemstones geography giveaway glass gold gray Greece green herringbone hex cuts history holiday home decor insects inspiration tip inspired beader Inspired by... Inspiring Links ivory Jewelry Stash knitting ladder stitch lampwork lariat leaf fringe leather lights literature loomwork macrame magatamas Master Class Medallions metal free metalwork Mini Collar a Week mixed media mixture Mood Board MOP multi-color multi-strand music natural beads nature necklace Necklace a Day Nepal chain netting New Beads ocean ombre orange paint paper patterns pearls pendant peyote photography Picasso finish pink Pinspiration PMC polymer clay poster sketch purple quick inspiration rainbow RAW red resin ring Ring a Day rivoli Rome Russian spiral scarf science seed beads shell silver soutache spiral rope spring square stitch St. Petersburg steampunk stringing stripes summer tagua TBT The Elements thread Tilas Time Capsule tools trade beads triangle weave tribal tropical turquoise tutorial two-hole beads Ugly vintage Wear it Twice weather white winter WIP wire wishlist wood World Beaders yellow
Blog Home * About * Beading Tutorials * Advertise

Learn About Sponsoring Inspirational Beading with Project Wonderful
Affiliated With ShareASale.com and Amazon.com